|
|
Posted by Paul ( in NY) [12.64.146.199] on Sunday, December 27, 2009 at 11:12:35 :
In Reply to: Leaf spring U-bolts.. posted by rick pacholski [98.26.211.168] on Saturday, December 26, 2009 at 18:41:57 :
A few tips on installing custom made U Bolts. Typically all manufactures of Spring U Bolt stock, supply them up to 9/16" in Grade 5 and 5/8" up in Grade 8. Before removing the old U Bolts, measure the overall length, then add about .750". Easier to be a little long than to short. You can wack the excess off later with a cut off wheel. Measure the width of your springs. Also take a old U Bolt sample to show your spring shop. They will use special Grade 5 or 8 U Bolt spring Stock and in a hydraulic bender...with the proper die, form the U Bolt. You will be given Deep Nuts and Hardened Thick washers. While your at the shop, run all the nuts on the U Bolt just to be sure they all have good threads before you leave. Dayton Spring recommends well lubricated U Bolts when Torquing. Check where you buy your U Bolts if they should be torqued Dry or Lubricated and ask the proper torque for the size your buying. With that said, lets get started;
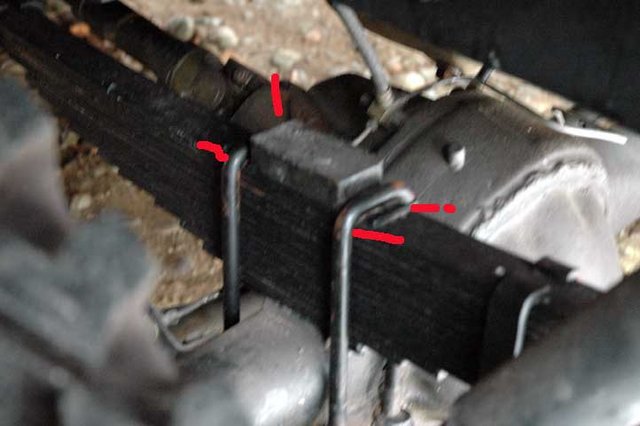
Our Dodge Trucks utilize a top plate, on top of the spring (see picture of my PW springs). The original OEM U Bolts were forged and had a FLAT underside of the U.
This flat side fit the top plate and allowed the U Bolt to sit perfectly flat on the top plate. However, the U Bolts you will have made are not forged, but rather formed. They have a radius on each corner of the U. Hold the Top Plate in your hand and hang a U Bolt on it as it would normally when installed. You will quickly see that the square edge of the top plate does not allow the U Bolt to sit totally flush in the center. Typically, there is about .010 clearance in the center. For proper clamping force, the U Bolt must be in 100% contact across the entire top plate.
Take a file or flap disk and just put a tiny radius on each edge of the top plate where the U Bolt will sit. I marked this in the picture in red. Now hold the top plate in your hand, hang a U Bolt on it, as it will sit when installed. If you can see daylight under the U Bolt.....Just 'love' the radius a tad more till the U Bolt sits totally flush. DO NOT BE TEMPTED.....to file a square edge on the U Bolt to accomplish this....you have destroyed/weakend the U Bolt. Make the radius on the Top plate !!!
Thats it quick and simple....but you have now achieved a flat clamping surface so the U Bolt displaces all clamping force across the entire top plate/top of spring.
Otherwise if you dont do this, your only clamping on the edges....not good.
Look here, on Page 4 there are good instructions on the actual torque operation and torque sequence;
http://imageevent.com/moosecreekmaple/axleubolt
All my trucks have new U Bolts installed this way.
Paul